So lets get started.


It will pull up this screen. This does not mean it is download. You must install. Choose the font file. Once it pulls up, there will be a install button. Once you do this, it is now installed to your computer and can be used.

In Design Space, click on the text button on the left of the screen. This will open a text box. You must type something in to choose the font and other edits. Fonts can only be accessed from here. When you go from insert image, it will not show up under the cartridge.

At the top, you can choose font options. All fonts will pull up every font from Cricut and the computer. System fonts are all the fonts that are downloaded to you computer. Cricut fonts are all the fonts that Cricut offers. This will include ones you do not own. Single layer will exclude any font with a shadow. Has a writing style is what you would like to write without an outline. Not all fonts have this option.


You can easily find a font by typing it in the search bar right under the fonts name. You do not have to type in the whole thing, it will start pulling up names that fit, like shown above.

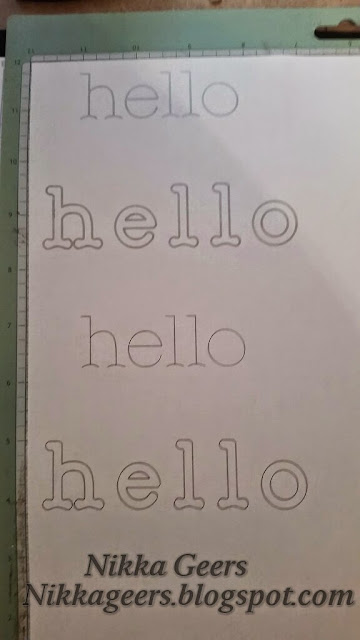
When you switch to write, the font will write the same way its cuts. This means it will write with an outline. Now once you choose has a writing style, it will write with a single stroke. Not all fonts have a writing style. You can see the difference between the two,
I forgot the do an arrow, but right below the name, you can choose regular, bold, bold italic, and if it is a writing style, writing and writing italic.
When you change to writing style, it will automatically change to write.

You can change the size by point, just like if you were changing font size in word. This comes in handy when trying to write in a card or on an envelope.
Or you can change the size by inches below letter spacing.
If you are doing words like above, you can change the justification to left, center or right.

Below the justification, is how the letters are grouped. You can do a word together or individual letters.

Once you chose to have the letters separate, you can move them, change theirs size, even mirror them. You can use the layers button to change the colors or switch to cut, ect.

Letter spacing will allow you to move letters together or apart. You can do vertically and horizontally.


You can mirror left to right and up and down.

You can move on a x y axis. This will make it easy to line up words. Have the letter on the same y plane. This is 2.74. If you do not attach, this will not come up once you go to cut.


This is what it should look like in the mat preview. If it does not, go back and attach.

It does not matter what setting you have it on, it will always write with the same pressure.
You can have it write with different colors on the same mat. It will prompt you to switch the color of the pens.
You can have it write with different colors on the same mat. It will prompt you to switch the color of the pens.

Place the pen in the pen holder, on the left of the housing. Go until it clicks. The pen should not be touching the mat at this time. If you are using a pen that is not Cricut brand, you can place a Popsicle stick and use that as a guide of placement for the pen. It must touch the Popsicle stick.
Here are two different type of pens, The first is the Cricut pen that came with the Explore. The bottom is the V5 pen, which is a super fine pen. There are more pens and markers that fit in the machine.
American Craft chalk markers (not bold)
American Crafts Galaxy markers (medium)
American Crafts Slick writer (fine or medium)
American Crafts Precisions pens (fine)
American Crafts Metallic marker (fine or medium)
Amy Tangerine Slick writer (fine)
Bic Round Stic ballpoint
Crayola Fine Line (not washable)
Marvy LePlume II
Pilot Precise V5 pens (.5mm) (clicker kind will not work)
Project Life pens
Recollections (fine and medium)
Recollections Photo markers (fine and medium)
There are more, I just haven't found a list for them.
The biggest question is if markers like Bic and Sharpie works with the Explore. It does not. But there is an adapter that can be used to use different pens and markers that cannot fit. I have no used them but have seen videos on them. You can find it {http://www.amychomas.com}.
Now you can write on everything, bags and envelopes and make your own tags and cards.
Join me for more tutorials. They can be found on my {tutorial page}.
To make sure you don't miss out on any new tutorials, artwork or members only specials, as it is easy to miss posts on Facebook and I don't post to all of them, join my {Facebook group}
Thank you for coming.
I am making a 12x12 scrapbook page and I want to center writing text at top of page. I am so confused. It seems the software only wants to write to save paper and goes to the left corner. Any suggestions? Thanks!
ReplyDeleteMake sure to select all and attach so the writing stays exactly where you have it. You must have it in a design. So if you dont have anything to attach to, make a square and have it score and just dont use the score tool
DeleteHello! could you please do a tutorial on how to print text then cut with cricut to make favor tags/labels, etc? I´ve looked everywhere for a tutorial and i cannot find it! i need help! thanks!
Deletehere is what you are looking for. you can substitute any color or shape. http://nikkageers.blogspot.com/2015/02/5mintutorialwhitebackground.html
DeleteIf I'm using multiple colors on a layout, how can I know what order it will write (1st color, 2nd color, 3rd color)? Thanks!
ReplyDeleteI havent tested this, but i imagine its like the regular colors. Darkest to lightest.
DeleteCould you demonstrate how to insert the V-5 pens in the Cricut Explore? I have the correct pens with the caps that everyone raves about, but I cannot get them inserted correctly. They will not touch the paper when I hit the GO button.
DeleteCould you demonstrate how to put the V-5 pens in? I was able to get the red pen to work one time.
ReplyDeleteNow if I try any of them, they won't touch the paper when I press GO. Is there a trick to these?
Everyone keeps saying they work great, but I have not had success with them. I am using the ones with the caps, not the click pens.
Hi, you are not alone, i have the same problem, I even tried doubling my card that worked once then stopped. I am trying ......
DeleteIf I have two lines of text, both have 10 characters, how do I keep the all the same size? On the expression you just picked say 2 inches as your size and everything was basically the same size. How does that translate on explore?
ReplyDeleteHello I am trying to make individual letters to cut out. I have a 8x11 peel & stick glitter foam sheets that I need to make the letters big enough to have 2 letters per sheet, I would like to get them as big as possible but for some reason can not comprehend how to do this.
ReplyDelete